VeganWeekly

Share this post
Thinking About Food and My Irish-Moroccan Roots
myfreshattitude.substack.com

Thinking About Food and My Irish-Moroccan Roots

From Whole Wheat Irish Soda Bread to a spring favorite using garden fresh vegetables…

Jack McNulty
Mar 17
4
2
Share this post
Thinking About Food and My Irish-Moroccan Roots
myfreshattitude.substack.com

I’ve involved with food and cooking in one way or another for most of my life.

I identify professionally as a Chef and Food Educator. But deep within me I know these are meaningless titles; it’s a path I follow – like many other people – to attain a bit of self-importance. Nevertheless, I can’t imagine a day in which I’ve not touched, smelled, seen, heard and tasted the results of something I cooked or grew…which means food represents a good deal of my true identity.

I can trace my first real connection to food with my first attempt at planting a garden. I was probably 11 or 12 years old when I first stuck my hands into the chocolate-brown earth without upsetting my mom or dad just to plant a few seeds. I couldn’t wait to get home from school so I could carefully water my little patch of the yard. I remember day after day gently moving away a bit of topsoil to see if any of the seeds I planted had sprung into life. Finally, I saw a tiny bit of green pushing its way through the earth and into the sunlight. I felt enormously proud. Several weeks later, I harvested four carrots and two radishes right there at the edge of my garden. Without hesitation, I rubbed off the dirt and enjoyed my harvest. My private salad tasted incredible – I felt the warmth of the sun in my mouth. I noticed a crunch from the slightly immature carrots and radishes – and a sugary sweetness I didn’t expect. I savored every second of that afternoon feast. And I couldn’t wait to unearth more of my garden’s treasures the next day.

urban gardening - photo by Jack McNulty

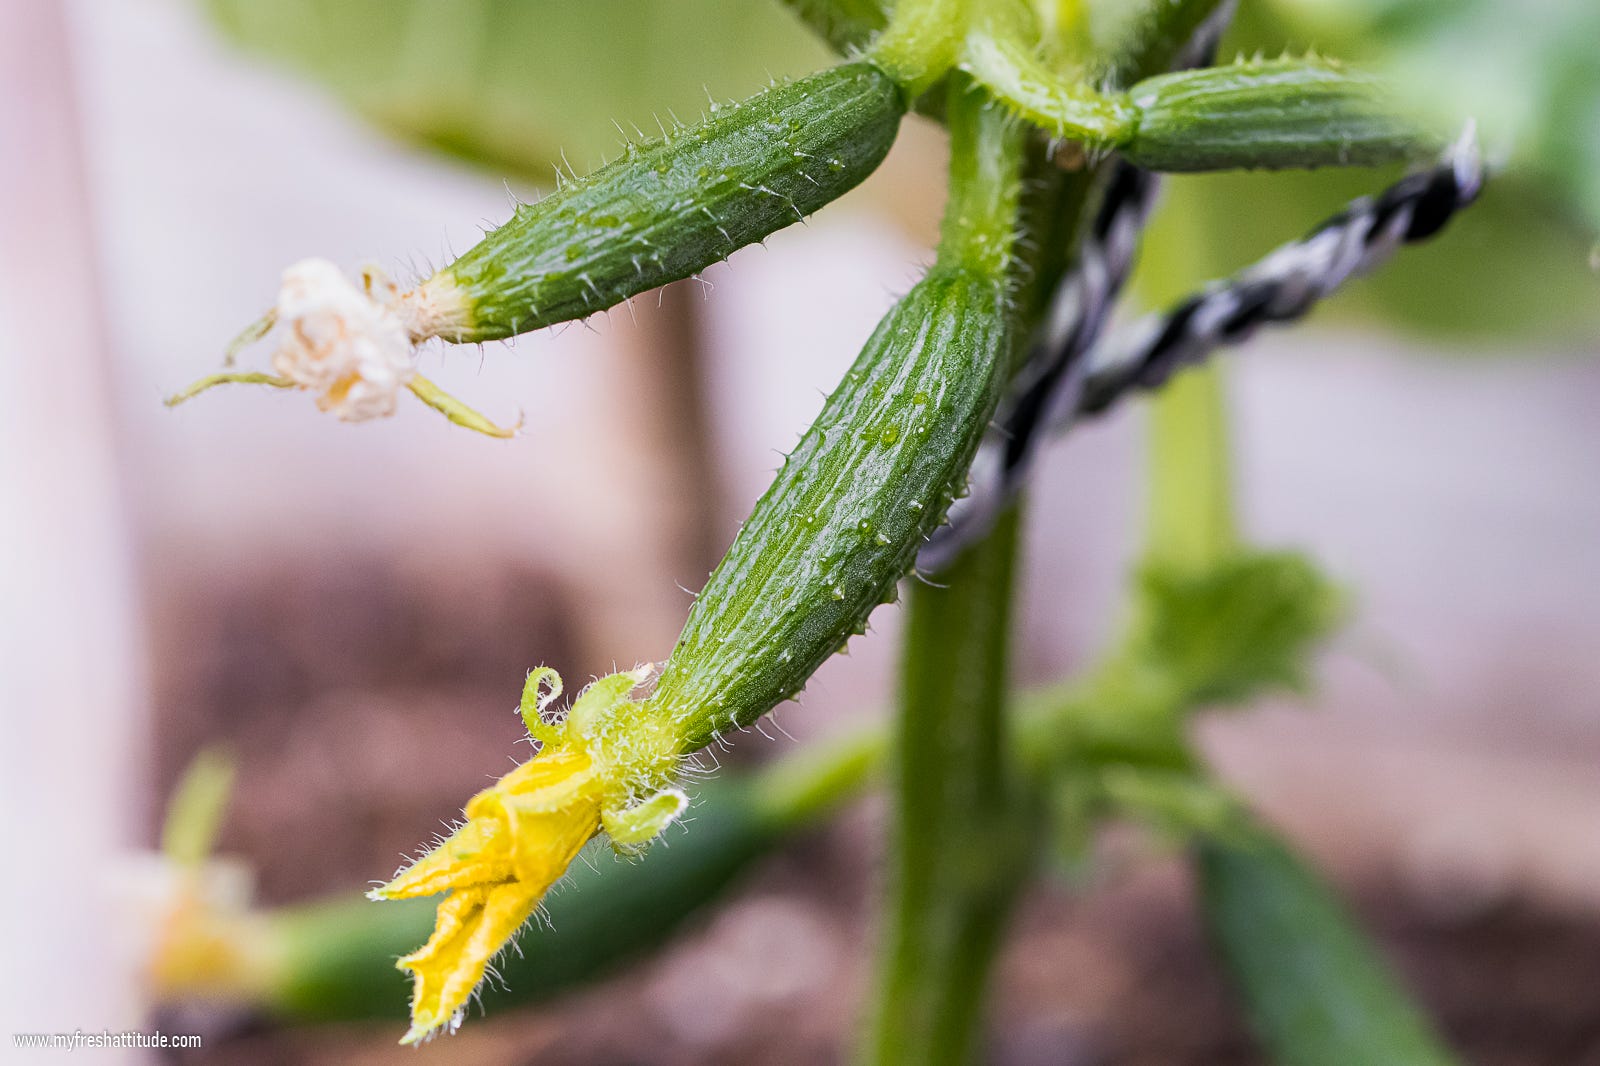
I think about my first gardening experience each time I eat a raw carrot or radish. I like to compare the taste against my memory of growing a perfect vegetable. Whenever I plunge my hands into the dirt of my current garden, I feel a sense of connection to my past, to the earth and sun, to my food and the natural cycle of seasons. I feel the interconnectedness and health of all living things – a healthy environment produces healthy soil and healthy food.

Growing food in my own garden had a profound effect on who I am and what I think about today. But my intense connection with food extends way beyond my early garden memories.

Much of my food-related history is rooted in memories of my mother and her cooking. Her Moroccan upbringing allowed me a chance to experience unique food, tastes and cultures that few of my friends ever experienced. As a child, I saw how much time my mother spent in the kitchen to lovingly prepare something fresh and delicious. But I think her real motivation came from her desire to share those kitchen creations with her family. That was her purpose.

The other half of my cultural identity is Irish – and this side of my family roots is also filled with food connections. My great, great grandparents emigrated to America at a young age. Most of them eventually settled in the midwestern states to begin a life chasing the American dream. They were farmers and explorers. The family history of their experiences revealed great adventures, an extremely difficult life and plenty of tales of farming. One interesting story of my great, great grandmother describes a life of hardship and little money until she finally was able to land job working as a servant to a prominent Illinois politician. Her job was to cook for the family and help the mother with household tasks – a common position for Irish immigrants settling in the slave-free northern US states. But this was no ordinary politician she went to work for. This was Abraham Lincoln.

I chose this week’s recipes as a way to celebrate my connection to gardening and to my Irish roots.

Please leave a comment below and tell me about your special connection to food – especially plants.

Leave a comment


Whole Wheat Irish Soda Bread

whole wheat Irish soda bread - photo Jack McNulty

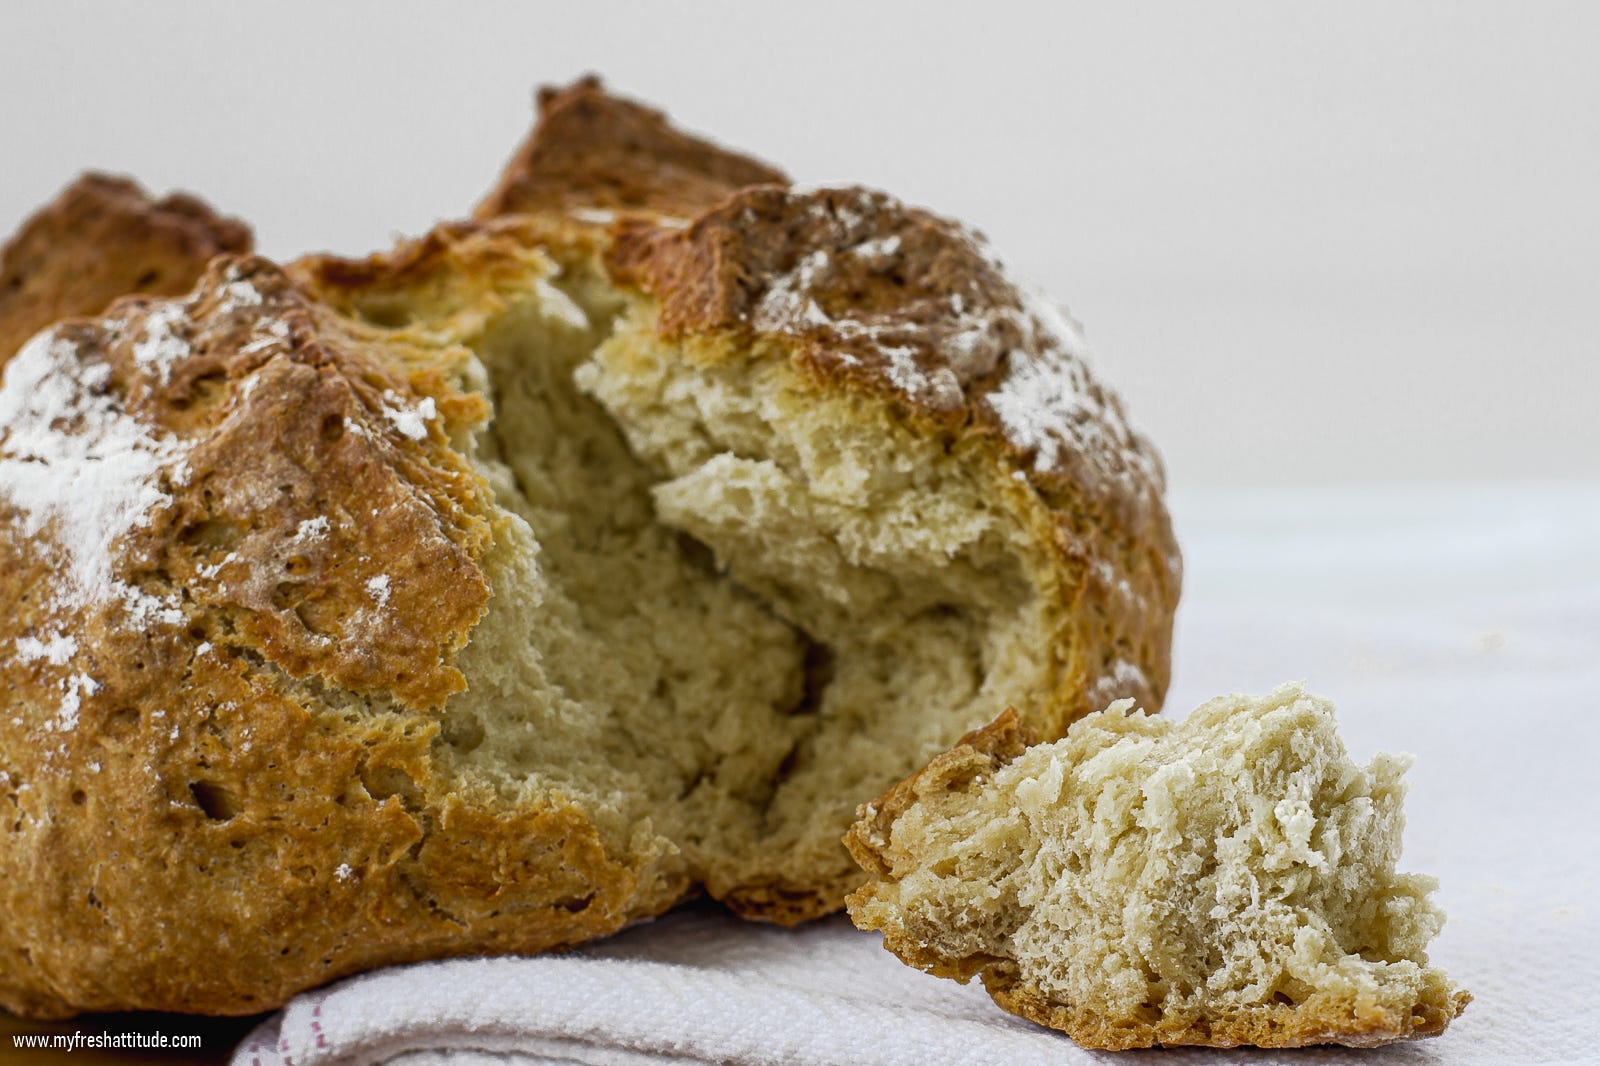
This is a great bread to make if you’re new to bread baking.

The dough is simple and comes together in minutes without any need for kneading. And, because of the lack of yeast in the dough, you won’t have to wait around while the dough proofs and rises. All that’s necessary is to mix together the dry and wet ingredients, form the dough into a ball or loaf, then put it in the oven and bake it. After an hour or so, your kitchen will be filled with the aromas of freshly baked bread carried by the escaping steam as you break the warm bread and reveal a moist and crumbly interior…perfect with a spoon of jam lathered on a slice.

Some versions of Irish soda bread include raisins in the dough as a variation but this is not the classical preparation. Instead, raisin filled soda bread is called a ‘spotted dog’ – a strange name but also delicious.

Irish soda bread can be made on a baking tray, in a loaf pan or in a ceramic oven-proof pot with a tight-fitting lid. My preference is to use the pot method because I like the extra crispy crust that is created from the trapped steam…which also produces a soft and crumbly interior.

Difficulty: simple
Yield: makes one large loaf…about 1 kilogram

Ingredients

  • 250 grams (2 cups) finely milled whole wheat flour

  • 250 grams (2 cups) all-purpose flour

  • 7 grams (1/2-tablespoon) baking soda

  • 10 grams (2-teaspoons) sea salt

  • 375 ml (1 ½-cups) non-dairy milk (oat, rice, soy)

  • 7 grams (1 teaspoon) apple vinegar

Instructions

  1. Preheat the oven to 210° C (410°F).  I use the convection fan in my oven. Be sure to add about 20°C (70°F) if your oven doesn’t have a fan.

  2. Oil and lightly flour an oven-proof pot which has a lid (alternatively, use a standard loaf pan or cover your loaf pan with a standard cooking pot lid or aluminum foil).

  3. Combine the dry ingredients in a large bowl, mix well with a spoon or fork, then sift into a clean bowl.

  4. Mix together the non-dairy milk with the apple vinegar and allow this mixture to stand for about 10 minutes. When the soured milk is ready, mix the wet ingredients into the dry ingredients and carefully combine…resist over-mixing the dough at this point. Allow the mixture to sit about 5 minutes to absorb all the moisture.

  5. Carefully remove the dough to a clean and floured work surface. If the dough appears too sticky, add 1-2 spoons of flour and lightly mix. Fold the dough like a book from all four ends, then turn over and form into a smooth ball. Form the ball into a log shape about the size of your loaf pan if that is what you are using, otherwise keep a nice round shape. Place the dough into the prepared pot or loaf pan. With a sharp knife, cut an ‘x’ deeply into the dough (this helps the dough to spread into four quarters after baking). Alternatively, make 5 even slices across the dough if you are using a loaf pan.

  6. Cover the pot, place into the preheated oven and bake for 30 minutes. Remove the lid and return the bread to the oven and continue to bake for another 10-15 minutes uncovered. The finished bread should be lightly browned and feel crisp and firm to the touch with a light hollow sound when tapping the bottom. Remove the bread from the pot or pan and place it on a wire rack to cool. Allow the bread to cool for about 30 minutes before attacking it.

Tips

The whole-wheat flour should be finely milled, which helps with the fluffiness of the bread. Check your flour – if it’s grainy to the touch, then it has large pieces of the bran and this will create a dense bread. You can pop the flour in a high-speed blender or food processor and blend at high speed for 3 minutes to create a finer textured flour.

It is important to get the baking soda, vinegar and non-dairy milk measurements accurate. Too much baking soda or vinegar (also too little) will create a soapy taste in the bread.

Be sure to sift the flours well to distribute the baking soda, flour and salt evenly. Non-distributed flour will cause the baking soda to work inefficiently with the vinegar and create…you guessed it…a soapy taste.

Thanks for reading VeganWeekly! Please consider subscribing to support my work.


Spring Vegetable Fricassée

spring vegetable fricassée - photo by Jack McNulty

If you spend enough time going through old and new French recipes, you will eventually run across a Fricassée recipe. This method of cooking – mixing vegetables, potatoes and some sort of white sauce with meat or fish – was common and highly regarded throughout France and Europe.

According to Larousse Gastronomique, the word fricassée evolved from fricot, a term used to describe any simple, tasty and popular dish – quite a broad definition that leaves plenty of space for individual interpretation. And that’s exactly what I’ve done.

I use any fresh spring vegetable I can find – typically 5-7 varieties. And I always try to include potatoes and my favorite type of mushroom. Those are my ingredient rules. I cook everything separately…and just long enough so the vegetables keep a bit. Once I have the vegetables prepared, I can leisurely finish the dish at the last moment by heating everything together in my white sauce.

I suggest serving this dish warm or at room temperature as a salad…perhaps with a bit of fresh bread and a splash of white wine or a light red.

Difficulty: moderate
Yield: makes about 4-6 servings

Ingredients

  • 500 grams (one pound) green asparagus

  • 500 grams (one pound) fresh green peas, shelled (see tips)

  • 500 grams (one pound) leeks, white and light green part only

  • 500 grams (one pound) celery stalk

  • 250 grams (1/2-pound) fresh carrots

  • 1 bunch spring onions

  • 100 grams (3 ounces) fresh morel mushrooms (see tips)

  • 500 grams (one pound) cherry tomatoes, roasted (see tips)

  • 2 tablespoons extra virgin olive oil

  • 1 tablespoon balsamic vinegar

  • 500 grams (one pound) small new potatoes

  • 1/2-cup Garlic Puree

  • 240 ml oat cream (see tips for gluten-free alternative)

  • 60 grams (2 ounces) pine nuts, roasted (see tips)

  • 2 tablespoons chopped herbs (I use dill)

  • Sea salt

Instructions

  1. Begin by getting all the vegetables prepared. You can cook them all individually in the same pot or use multiple pots and cook the vegetables a bit faster. I use one pan for the blanching of the vegetables, then use the same pan to cook the mushrooms and finish off the final dish (I’m not a big fan of washing dishes). Heat a wide pot or large pan (like a wok) over medium heat. Add enough water to come about halfway up the pan or pot, then turn the temperature to high and wait for the water to boil. Once the water boils, add a good amount of salt to the boiling water and stir to dissolve. Don’t skimp on the salt – you want the water to taste a bit like the sea before cooking the vegetables.

  2. Prepare the asparagus by lightly peeling away the little leaf-like bits on the stem. Cut off any woody part of the stem. Place the asparagus in the boiling salted water and cook for 3-5 minutes. Remove to a clean plate and cool at room temperature. Be sure to slightly undercook the asparagus.

  3. Move to the peas next. Wash the shelled peas and cook them about 2-3 minutes in the same water you used to cook the asparagus. Remove to a clean plate or bowl.

  4. Slice the leek into strips about 2-cm (1-inch) thick. Soak in cold water for about 10 minutes to remove any hidden dirt. Blanch the leek in the same water for 3-5 minutes. Again, be sure to undercook them slightly. Strain the leeks and reserve on a clean plate.

  5. Slice the celery stalk into 1-cm (1/2-inch) slices. Cook 2-3 minutes in the boiling salted water. Strain and reserve.

  6. The carrots should be peeled and sliced relatively thin. You can make strips or slices of the carrots depending on your mood. The key is to blanch the cut carrots just long enough to soften them without losing too much crunch. Strips from a peeler will take about 30 seconds. Slices about 1/2-cm (1/4-inch) will take 2-3 minutes to cook.

  7. Clean the spring onions and remove about half of the green part. Slice the remaining spring onion fairly thin. Cook the sliced onion in the same boiling water for 30 seconds. Strain and reserve.

  8. Prepare the morel mushrooms next. Remove the water from your pan, wipe dry and heat over medium high. Halve the mushrooms, being sure to look for any hidden bugs or stones. Once the pan is hot, coat the mushrooms in 1 tablespoon extra-virgin olive oil and cook over medium-high heat for about one minute. Add a pinch of sea salt and 2 tablespoons water. Continue to cook the mushrooms until the water evaporates. Repeat for 2 more sessions. Once the liquid evaporates for the third time, remove the mushrooms and reserve on a clean plate.

  9. To roast the tomatoes… Preheat the oven to 200°C (390°F) Slice the tomatoes in half and place on a baking sheet lined with baking paper. Season with a bit of sea salt. Lightly dribble extra virgin olive oil and balsamic vinegar on the tomatoes and place the pan in the oven. Roast for 20-25 minutes (be sure to set a timer). I like the tomatoes to have a bit of caramelization, so sometimes I add a pinch of sugar too.

  10. Wash the potatoes well. Bring a pot of water to a boil, add the steamer or steamer insert, then add the potatoes with their skins intact to the steamer. Cover and steam about 20 minutes. Make sure to cook the potatoes until a knife is easily inserted into the thickest part of the potato. Remove and cool.

  11. Once everything is separately prepared, you can move onto finishing the sauce and the dish. Wipe that large pan clean (no need to wash it after cooking the mushrooms) and heat over medium temperature. Once hot, add the oat cream and garlic puree. Stir to incorporate, then turn up the temperature to medium-high. Begin adding the reserved vegetables to the white sauce while it is cooking. Start with the potatoes and mushrooms, then add asparagus, peas, leeks, celery, carrots and spring onions. Mix well. Add the roasted tomatoes next, along with any of their juices. Mix well, add the pine nuts, chopped herbs and adjust the seasoning. If your sauce cooked down too much, just add a bit of water or more oat cream.

Tips

If you prefer white asparagus, then be sure to refer to our poached white asparagus recipe (without the rouille) and follow those instructions, making sure to slightly undercook the asparagus.

You can easily use frozen peas in this recipe in place of the fresh ones. Allow the frozen peas to thaw, then blanch them in boiling salted water for about 2 minutes. Remove them at once and reserve.

It is possible to use dried morel mushrooms instead of fresh ones. Reconstitute the mushrooms in just-boiled water for about 30 minutes, strain (keep the liquid for some other use), then sauté briefly.

For a gluten-free version of this recipe, be sure to replace the oat cream with another type of non-dairy cream – soy is my first choice, followed by rice. Be sure to check the ingredients and try to find an alternative without a lot of ingredients. You may need to combine an extra teaspoon of tapioca or corn starch to help with the thickness of the cream. If this is the case, then make sure you do that after reducing it down with the garlic puree.

To roast the pine nuts… Place all the nuts onto a small baking tray and then into the oven. Turn the oven temperature to 150°C (300°F) and set your timer for 24 minutes. Remove the pine nuts, which should be slightly golden, and cool to room temperature.

Another optional addition I use at times is seared tofu pieces. Cut firm tofu into cubes. Place in a bowl, then add 2 tablespoons soy sauce, 1 tablespoon balsamic vinegar, a pinch of salt and several squeezes of pepper. Cook the tofu pieces in a pre-heated non-stick pan over medium-high heat until lightly caramelized. This will only take about one minute. Turn the pieces over and cook the other side. Add the soy sauce and balsamic vinegar to the pan, turn the heat to high and finish cooking the tofu until the liquid turns into a glaze. Remove and cool completely.

Please be sure to subscribe to VeganWeekly if you haven’t already…


You can enjoy the full experience of everything I have to offer by subscribing to myfreshattitude.com

subscribe to myfreshattitude.com


VeganWeekly is now available on the new Substack App…

Read VeganWeekly in the new Substack app
Now available for iOS

2
Share this post
Thinking About Food and My Irish-Moroccan Roots
myfreshattitude.substack.com
2 Comments

Create your profile

0 subscriptions will be displayed on your profile (edit)

Skip for now

Only paid subscribers can comment on this post

Already a paid subscriber? Sign in

Check your email

For your security, we need to re-authenticate you.

Click the link we sent to , or click here to sign in.

Stygi
Writes Midweek Crisis Mar 17·edited Mar 17Liked by Jack McNulty

Wow, I can't imagine how wonderful it must have been to eat something grown by yourself. You're a lucky person. Having my own garden is one of my biggest dreams. I hope one day I'd manage to take care of one. Thank you for sharing such beautiful memories ✨

Btw, you've made me so hungry! All I think about is what I'd eat right now. I consider myself to be a serious foodie. I adore everything with firm skin and juicy, preferably crunchy insides - cucumbers, apples, pomegranates, radishes. I'm addicted to potatoes, and I think I could eat them in every possible form. I can't imagine also living without the rich, sweet taste of beetroots, cauliflowers, eggplants, or tomatoes. One time, when I was living in a flat with a big, glass-enclosed balcony, I've managed to grow some cherry tomatoes 🍅. And damn, how proud and emotional it made me feel. So cool to recall it.

Expand full comment
ReplyCollapse
1 reply by Jack McNulty
1 more comments…
TopNewCommunity

No posts

Ready for more?

© 2022 Laughing Lemon By J. McNulty
Privacy ∙ Terms ∙ Collection notice
Publish on Substack Get the app
Substack is the home for great writing