
Simple Flatbread Recipes Worth Making
Simple Flatbread Recipes Worth Making
Three delicious recipes to get bread on your table without much hassle…but most certainly, with great joy!

I like baking bread at the beginning of the year.
It’s a bit of an odd ritual. Some are busy writing out resolutions to lose weight…or eat more vegetables…or exercise more. Others vow to get more organized, save money, or live life to the fullest – perhaps even quit smoking.
I’ve done all that…and I bake bread.
I don’t recall when this tradition began. It probably has something to do with a special memory I have from my just-before-becoming-a-teenager days. I remember riding one of those yellow American school buses to and from grade school. On the ride home, I often thought about baseball and wondered if my mom had made bread. Would I soon walk into our house and fill my nose with the soothing aromas of bread?
I salivated then, as I do now whenever I catch a whiff of freshly baked bread.
Clearly, I’m not alone. According to an article in The Irish Times, scientists have determined that the aromas in freshly baked bread play a crucial part in stimulating positive childhood memories.
“The smell is almost universally loved and promotes a Pavlovian response in almost everyone because it prompts “odour-cued memories” at a subconscious level which catapult people back to very specific points in their childhoods.”
Maybe my bread-making ritual has something to do with holding onto my childhood past while coming to terms with the inevitable marching of time – a sort of way for me to slip back in time for a brief moment. I don’t know…but I do like baking bread at home.
Making Bread at Home
There aren’t too many cool things that happened during covid lockdown days – even for the lucky ones like me, who live in a country with relatively relaxed lockdown rules. But one thing does come to mind…the baking sourdough bread at home craze.
Sadly, this craze didn’t last long, but it did produce some happy Instagram moments for many who used the lockdown period to scratch a creative itch. Me included.
I’m sure many were pleased with their artisanal results…and the aromas wafting through every corner of their home. I’m sure there were many oohs and aahs uttered when the bread knife pierced the golden crust of the warm bread and little crumbs dropped to the floor. And at that precise moment, I’m sure many thought the same as me, “I should be making more bread at home.”
But as lockdowns eased and the novelty of making bread at home inevitably waned, most people simply and quietly calculated the opportunity cost in their heads…and concluded that it was much easier to go to the supermarket or local bakery and buy bread…with the added benefit of having a crunchier crust.
I thought about these things last week as I carried on with my January bread-making ritual. I wondered if making sourdough bread went too far for the masses. Maybe we should be aiming for something a bit flatter…a bit easier…far less demanding. Perhaps it wasn’t necessary to have a sourdough starter as a pet. Maybe we can still make bread by mixing flour, liquid, salt…and a bit of fat. And enjoy the finished product in an hour or so.
The Case for Flatbreads at Home
Flatbread has been around for a long time…a very long time. Some historians say the idea of making bread began in ancient Egypt, while other food historians point to ancient China and early barley-based flatbreads as the rightful birthplace. It’s hard to say if these early, unleavened versions were bread or something closer to what we call a cracker.
The early versions of flatbread throughout the middle east and the far east were made by mixing roughly milled flour with water and salt, then baking in some kind of open oven. These types of bread morphed into different variations with subtle differences – flatbread like naan baked on the walls of a tandoori oven, Israeli laffa or unleavened matzo, Turkish or Greek pita bread, incredibly thin Turkish yufka, Lebanese mana’eesh, and of course, Chapati found throughout India, Pakistan, Sri Lanka and Bangladesh.
Then there’s Ethiopian injera or kitja, Moroccan batbout and msemen, kisra from Sudan, or kesra from Algeria. While in Europe, there is thin pane carasau from Sardinia, Armenian lavash, Italian farinata, focaccia, piadina, and even pizza. And, of course, tortillas from Central America.
The point is that most cultures have some type of flatbread to offer…and most are not available in supermarkets or from the bakery down the street. Sure, they may have a generic offering, but it won’t taste even close to the original. And they are mainly simple to make, require few ingredients and come together quickly.
And let’s not forget about those food memories that may rise up and catapult you back in time…and a happy childhood memory.
Getting Started with Flatbread
Here’s a glimpse of the basics that you’ll need to begin making flatbread at home:
Time:
Count on 10-15 minutes to gather and mix the ingredients, 30 minutes to rest the dough, and 30 minutes to cook all the flatbread.
If yeast is involved, add 60-90 minutes to allow enough time for the dough to ferment.
Ingredients
Bread flour and all-purpose flour
Dry active yeast
Fine salt (sea salt or kosher salt)
Extra virgin olive oil or unprocessed rapeseed oil
Equipment:
25 cm (10 inches) frying pan – preferably stainless steel or cast iron
Baking trays and a baking stone (not mandatory, but helpful)
Scale
Measuring cups
Baking paper
Food processor, stand mixer, strong hands
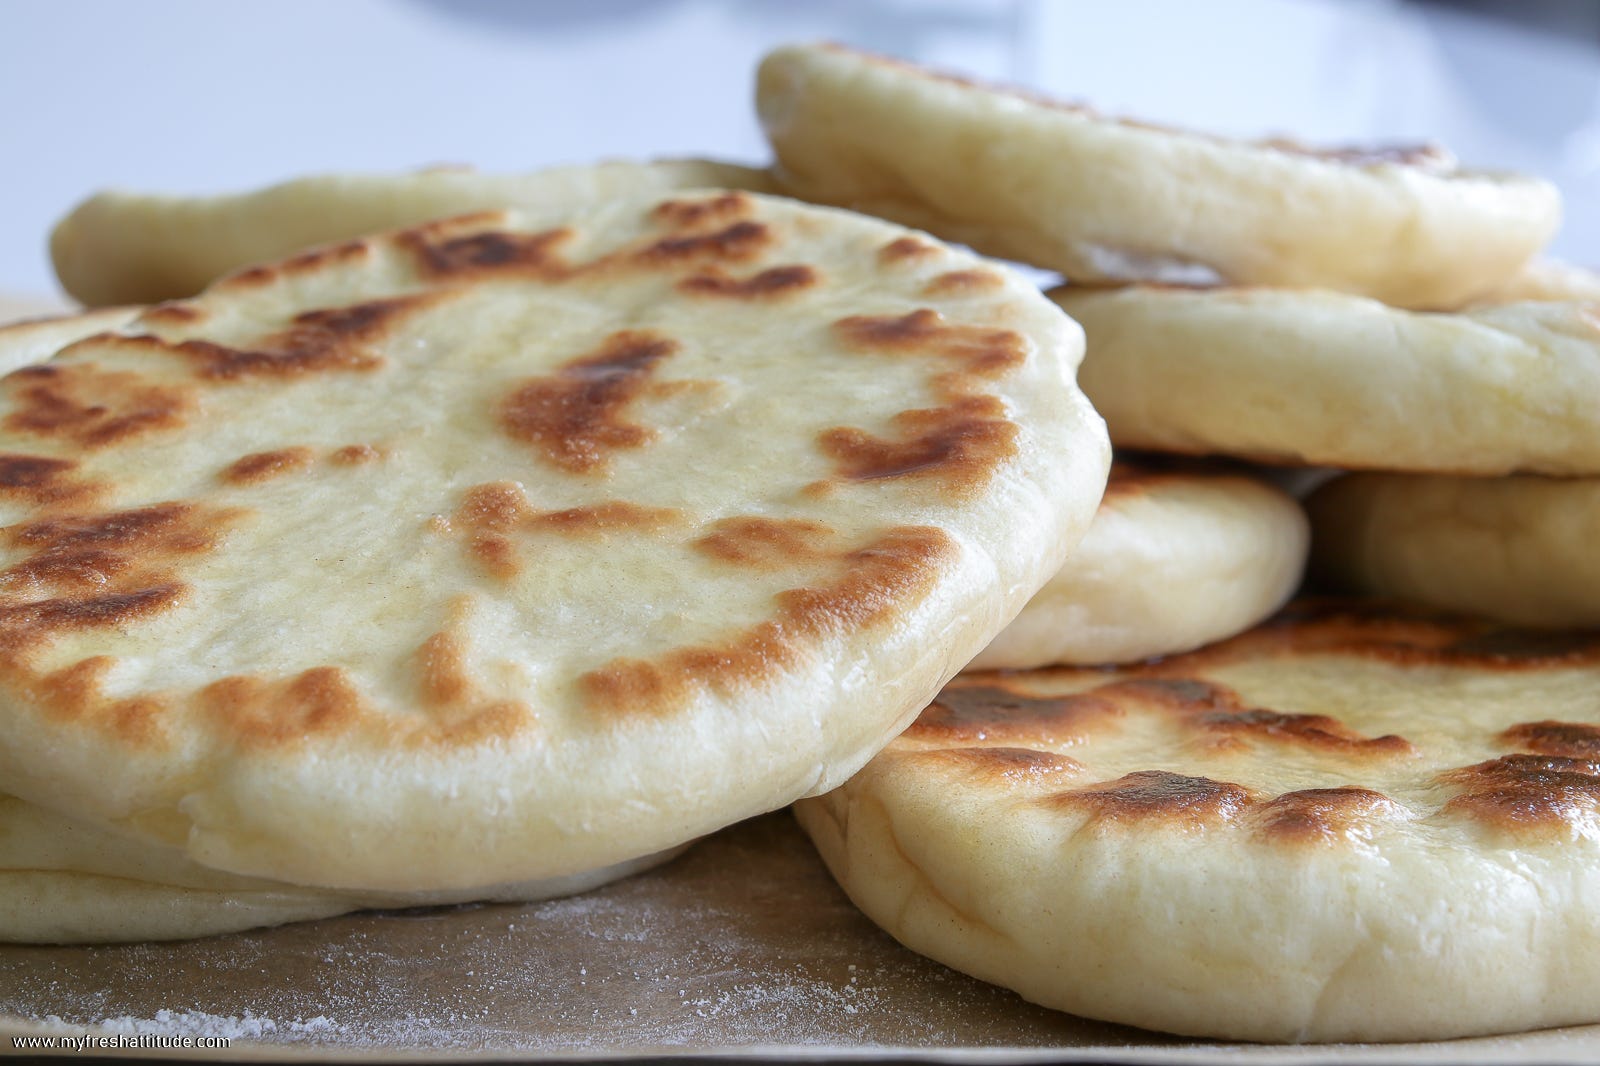
All-Purpose Flatbread
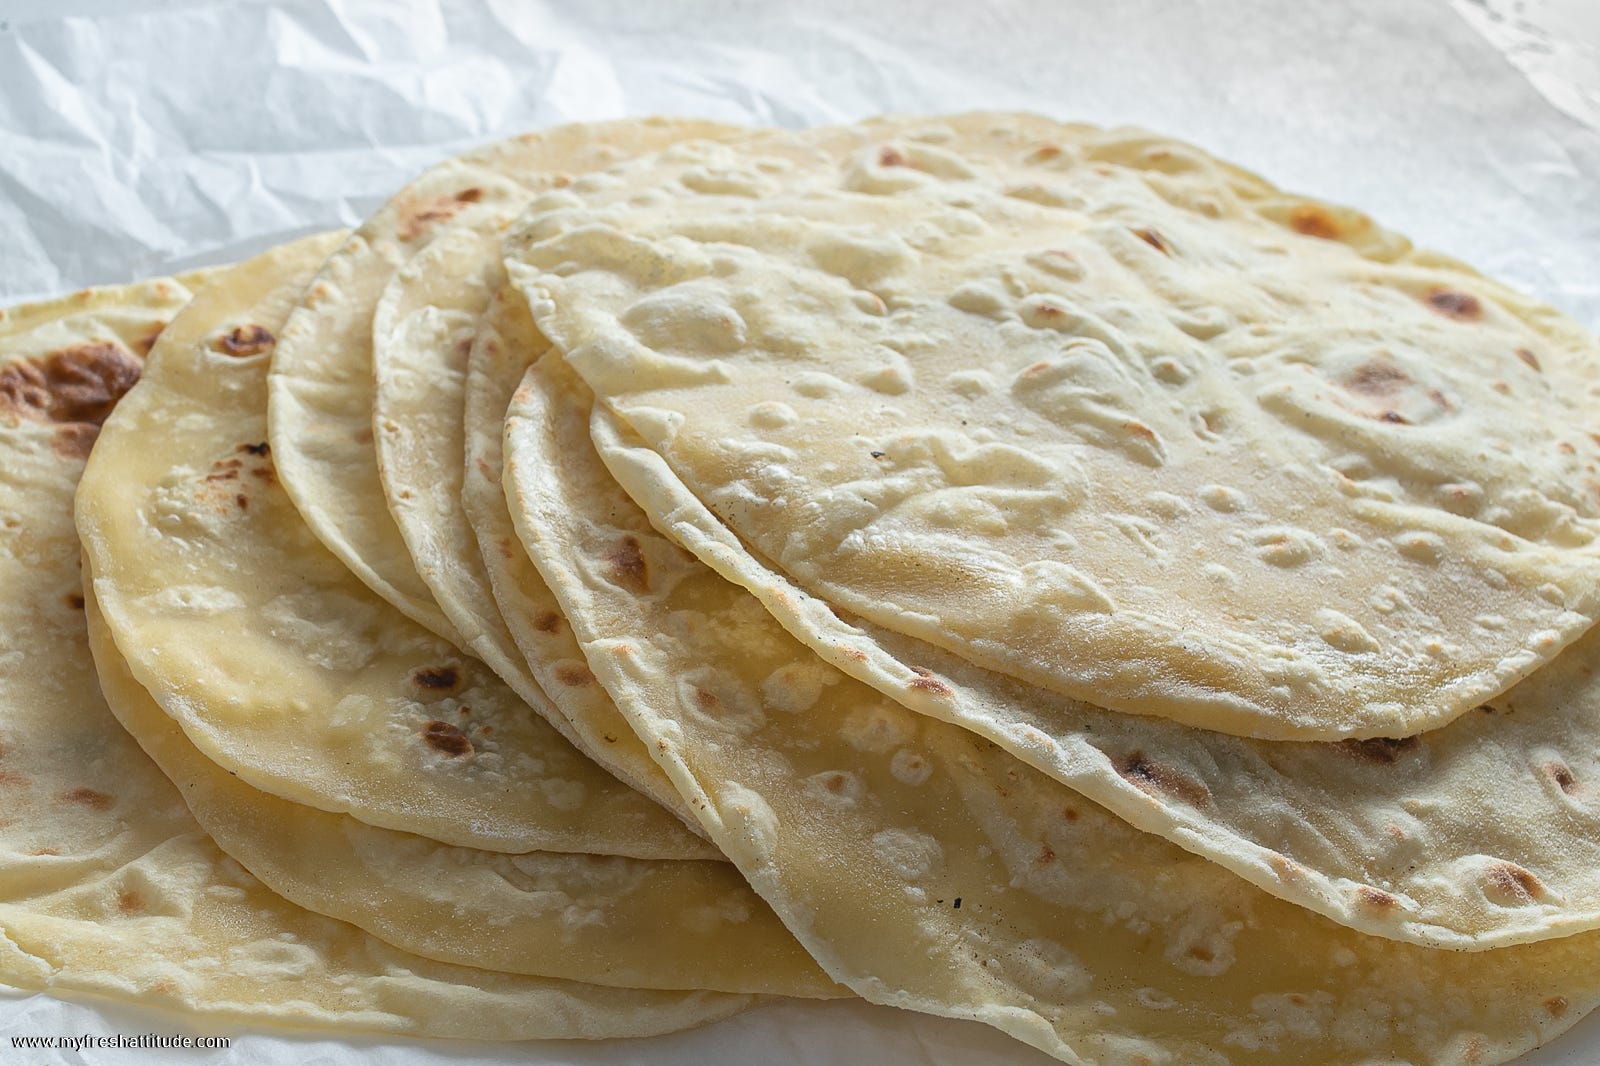
Flatbread is one of the easiest types of bread to make because it often only involves mixing flour, liquid, salt and a bit of oil into a smooth and cohesive dough. The dough is separated into smaller balls, rolled into thin, flat disks, and cooked in a hot frying pan for about one minute.
My all-purpose version is straightforward to prepare – and extremely simple. The dough can be mixed in a food processor for a few seconds or mixed and kneaded by hand for a few minutes. The outcome is a thin and pliable flatbread that can be used as a wrap, to sop up the leftover bits of curry, or as a flour tortilla. I especially enjoy using it to encase crispy falafel, some crispy vegetables and a slightly spicy soy yogurt-based sauce.
Difficulty: simple
Yield: makes 10 flatbreads
Ingredients
250 grams (1/2 pound) of all-purpose flour
1 teaspoon of fine salt
45 ml (3 tablespoons) of unprocessed rapeseed oil or extra virgin olive oil
180 ml (3/4 cup) water or soy milk
Method
Place the flour and salt into a food processor fitted with a steel blade. Pulse to combine. Add the oil and process on low until the mixture resembles coarse crumbs. While the machine is running, add the water or soy milk in a slow and steady stream. Process on low until the dough forms into a rough ball.
Remove the dough and place it on a lightly floured work surface. Knead the dough by hand for 1-2 minutes until it loses most of its stickiness and becomes smooth. Resist the urge to add more flour to the work surface… keep kneading the dough, and it will quickly stop sticking. Cover the dough with plastic wrap and allow it to rest for 15 minutes.
Divide the dough into 10 equal portions (this will be about 45 grams/1 1/2 ounces if you’re using a scale). Roll each portion into a smooth ball and place them on a lightly floured surface. Cover with a damp towel and allow them to rest for another 15 minutes.
Preheat a frying pan – preferably stainless steel or cast iron – over medium heat. While the pan heats, use a rolling pin to form thin 20 cm (8 inches) discs on a lightly floured surface. Brush off the excess flour from each disc. Begin cooking the flatbreads once all of the discs are formed.
Place one of the discs in the preheated pan and cook until bubbles form on the top side of the flatbread – about 20-30 seconds. Flip the bread and cook the other side for another 20-30 seconds, then remove to a plate. The flatbread should have light brown spots – if the spots are too dark, reduce the heat a bit before finishing the remaining flatbread. Cover with a dish towel and enjoy warm.
Tips and Variations
The flatbread is best eaten fresh, and while still warm They can be stored in a tightly sealed plastic bag and reheated quickly on an individual basis (the microwave works best…or quickly in a hot pan). Alternatively, flatbread can be frozen for up to 6 months. Defrost them thoroughly, wrap them in aluminum foil and gently reheat them in a warm oven.
I like using a moderately hot pan, which means there is a danger of overcooking the bread and leaving it dry. I recommend staying with the project and resisting the urge to do something else while the bread is cooking. Speaking from experience, distractions guarantee some burned bread!
Mana’eesh
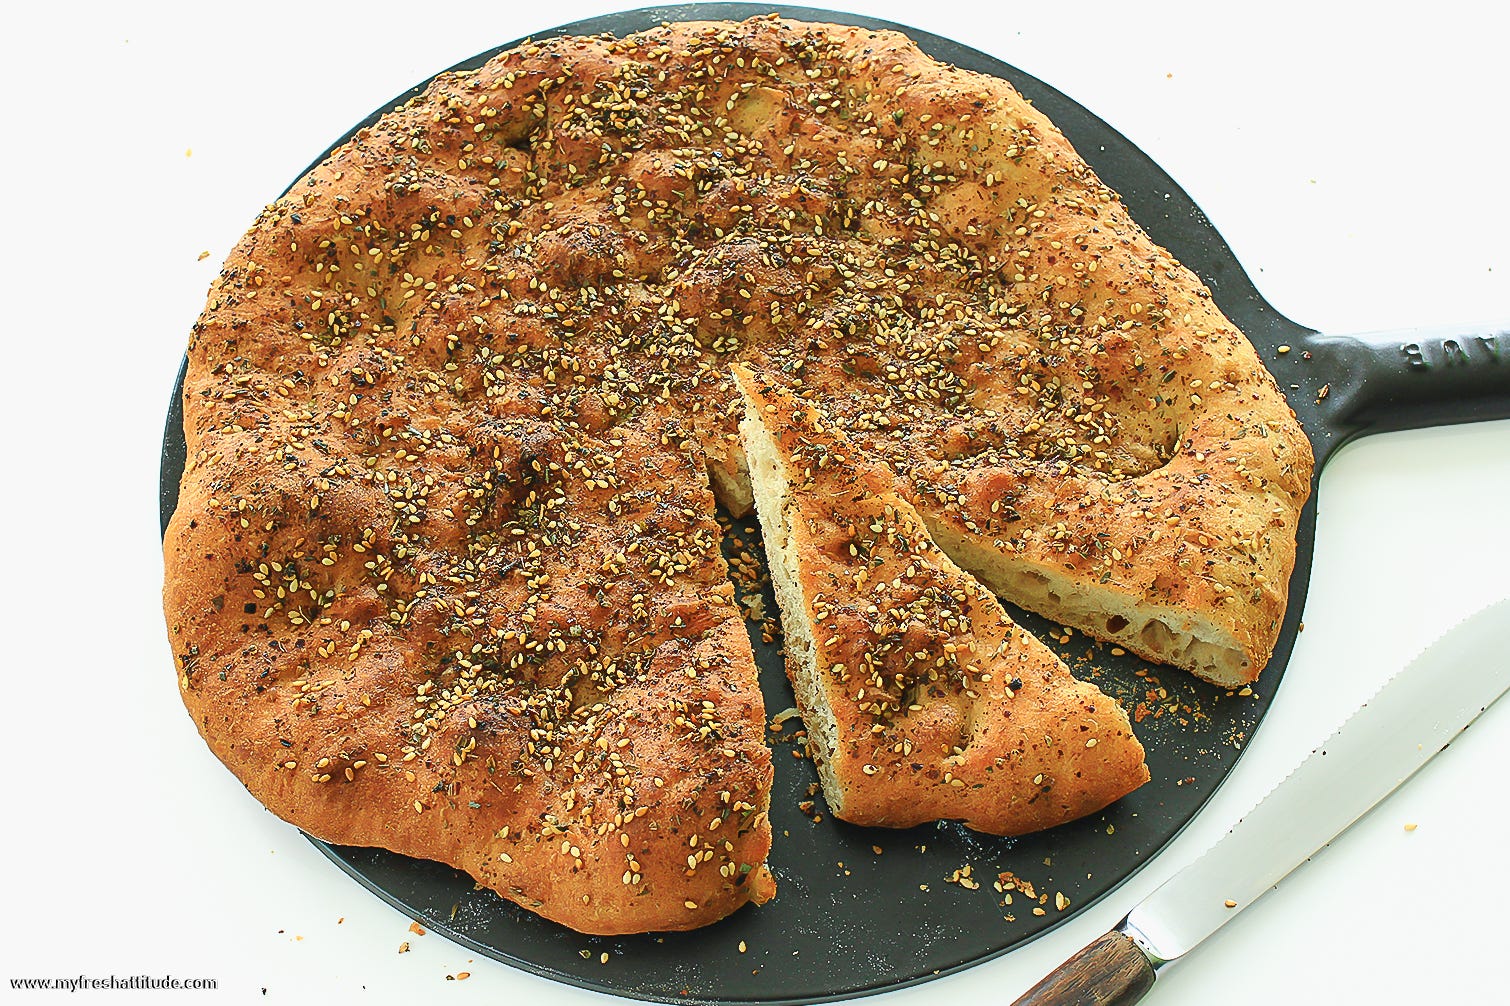
Mana’eesh is extremely popular in Lebanon, where it is consumed in the morning with breakfast or during the middle of the day with a cup of tea and some other snacks. I think it is a fabulous bread to enjoy with a middle-eastern meal or with popular dips like hummus, Byesar or Baba Ganoush.
Now, what about that name? Most people outside the Middle East pronounce (and spell) this bread as Maneesh – something I also did for many years…until a dear friend with Syrian and Lebanese roots corrected my butchered pronunciation. She told me the name, which means something like chiseled, comes from how it is formed and given dimples like Italian focaccia. Oh…Mana’eesh is the plural form. Call it Man’oushe if making just one bread…but this bread is so good, there isn’t a reason to make just one!
Difficulty: simple- to moderate
Yield: makes two flatbreads
Ingredients
500 grams (one pound) of bread flour
10 grams (2 teaspoons) of fine salt
35 grams (2 1/2 tablespoons) of granulated sugar
10 grams (2 1/4 teaspoons) of active dry yeast
30 grams (2 tablespoons) of extra virgin olive oil
350 ml (1 1/2 cups) water
Extra virgin olive oil for topping
4 tablespoons of za’atar for topping
Method
Place the flour into a large mixing bowl. Add the sugar, dry yeast, olive oil and almost all the water (hold back 2-3 tablespoons of water to adjust if the flour doesn’t absorb everything).
Mix on low speed for about 2-3 minutes until the ingredients are well combined and begin to form into a dough. Add the salt and mix on low to medium for about 5 minutes. Stop mixing and allow the dough to rest for 20 minutes, then continue mixing for an additional 5 minutes. The dough should be smooth, elastic and slightly moist (sticky when touching it).
Carefully remove the dough, and place it on a lightly floured surface. Coat your hands with olive oil and knead the dough for 1-2 minutes, then lightly coat the dough again with a small amount of flour. Place the dough back into the bowl, cover it with plastic wrap and allow it to ferment for about 60-90 minutes – it should double in size and show slight signs of bubbling on the edges of the dough.
Preheat the oven to 230°C (450°F). Place two baking trays or stones in the oven to heat.
Carefully remove the dough from the bowl and place it onto a lightly floured surface. Flatten the dough and fold it in on itself repeatedly until all the air is knocked out and the dough is smooth and pliable. Divide the dough into 2 equal pieces and shape each into a ball. Roll each ball into a large circle, about 20-23 cm (9 inches). Place each round onto a floured piece of parchment paper (this will make it easier to transfer the bread to the hot baking stone or tray). Coat one flatbread with extra virgin olive oil. Sprinkle za’atar over the flatbread to cover the top completely. Carefully transfer it to the preheated stone or baking tray. Bake in the middle of the oven for 15-18 minutes. Transfer to a wire rack to cool, then repeat with the remaining flatbread.
Tips and Variations
You can easily make a za’atar mixture by combining toasted sesame seeds, dried thyme and ground sumac in equal portions. Alternatively, most stores specializing in middle eastern food will have za’atar on hand.
Indian-Style Naan
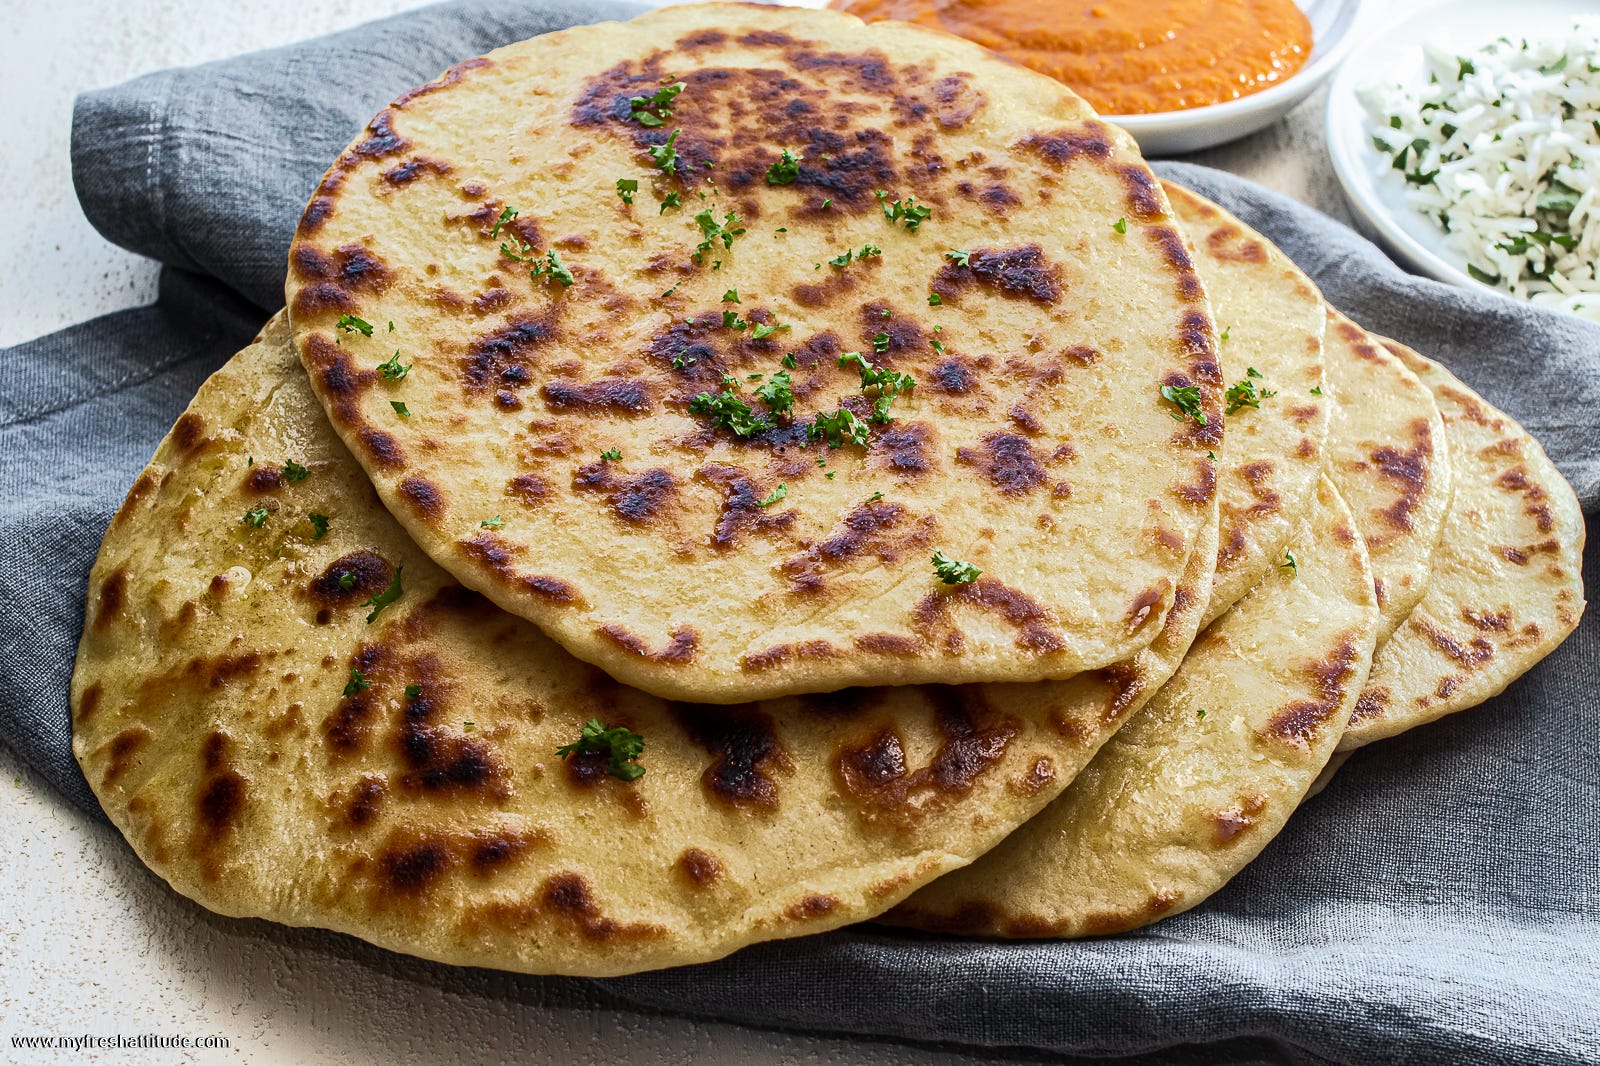
Most fans of Indian cuisine are also naan aficionados. And why wouldn’t you be? It’s difficult to resist a warm and slightly thickened flatbread with a fluffy interior and a crust that is neither soft nor crunchy – just something in between. There’s always a coating of something on the bread – maybe a bit of fat or some slight suggestion of garlic – that enhances the experience and becomes addictive.
Naan is a soft bread that works perfectly with a spicy curry, sweet and sour pickles, herb-infused rice, creamy and rich sauce-covered roasted vegetables, or as I like to do – something delicious to enjoy alone while allowing my mind to drift and travel unknown places I’m sure I will visit one day.
My vegan version is simple to make. You should end up with 13 flatbreads that will be fine for a day or two…or happily hang out in your freezer for a month or so until you are ready to eat a few more.
Difficulty: simple- to moderate
Yield: makes about 13 flatbreads
Ingredients
250 ml. (1 cup) soy milk (or any non-dairy milk)
2 teaspoons sugar
15 grams (3 teaspoons) of active dry yeast
500 grams (1 pound) of all-purpose flour (see tips)
10 grams (2 teaspoons) of fine salt
1 teaspoon baking powder
3 tablespoons unrefined rapeseed oil
180 grams (3/4 cup) of soy yogurt
2 teaspoons cornstarch
2 tablespoons of water
Extra flour for rolling out the naan
Extra unrefined rapeseed oil to finish the naan
Method
Making the dough takes about 15-20 minutes, and then another 60-90 minutes to allow the dough to proof (rise). Begin by combining the soy milk, sugar and dry yeast in a small bowl. Gently stir the mixture and allow it to rest for 5-10 minutes. This helps ignite the yeast – which is important in this recipe because you want the dough to ferment quickly. It is also helpful to ensure that the soy milk is at room temperature.
In a large bowl (or the bowl of your mixer if using one), combine the flour, sea salt and baking powder. Make sure everything is equally distributed.
In another small bowl, combine the oil, soy yogurt, cornstarch and water. Mix well.
To finish mixing the dough, add the oil and yogurt mixture to the flour mixture. Mix them quickly. Add the yeast and soy milk mixture to the flour and begin kneading the dough (I use a mixer and allow the dough to knead for 8 minutes. Knead the dough well until it is smooth, slightly sticky and quite elastic if preparing the dough by hand). Coat the dough lightly with oil, place in a large bowl and cover tightly with plastic wrap. The dough needs about 60-90 minutes to rise completely – at least twice the volume.
When the dough is ready, gently remove it from the bowl and place it on a floured work surface. Flatten the dough with your hands, then fold one end about 2/3 toward the other end. Take the opposite end and fold it back over your first fold – sort of like closing a book. Flatten the dough, then roll it out into a long log shape. Portion into 13 pieces (about 85 grams/3 ounces if using a scale). Form each part into a smooth ball, place on a well-floured surface (I use baking paper on a baking tray), cover with a towel and rest the dough balls (and yourself) for 20 minutes.
Preheat a non-stick pan – preferably stainless steel or cast iron – over medium heat until the pan is quite hot.
It’s now time to make our naan! Flatten one of your naan portions and gently roll it out with a rolling pin into a rectangle or circle (you decide the shape). The dough should be relatively thin – not see-through thin, but about the thickness of a closed magazine. Place the naan in the preheated pan and cook for about 1-2 minutes (be sure to adjust the temperature – I prefer a medium setting). You should see bubbles begin to form on the top surface – this is your clue to flip the naan, which should be lightly golden on the cooked side with a few light brown spots. Cook another 30-60 seconds, then remove the naan to a plate. Brush the naan with a light coating of oil and keep it covered with a towel while working on the remaining 12 portions.
Tips and Variations
To reheat frozen naan: defrost the naan for an hour or so at room temperature, then place them in a preheated 140°C (285°F) for about 5 minutes. Alternatively, toss the defrosted naan in a preheated non-stick pan until heated through…, or if you’re really in a hurry, just pop defrosted naan in a microwave for 10 seconds.
You can make this recipe with whole-grain flour. Choose a flour that has been milled fine or use a moderately milled whole grain flour mixed with an equal amount of all-purpose flour. Whole grain flours that are roughly milled contain too much bran, which cuts the gluten strands and makes a dense flatbread – this is not ideal.
It’s essential to ensure your cooking temperature isn’t too hot. I don’t like black spots on my naan. Go for something like darkish golden instead…adjust the temperature accordingly until you land on the sweet spot based on your stovetop and your pan.
You can make naan in the barbecue if you have a stone you can cook on – something like a pizza stone. Make sure the stone is well-heated beforehand and keep your barbecue temperature hot – this is much easier with gas barbecues. You can use a non-stick pan for this recipe instead of a cast iron pan –be sure to heat over lower temperatures and avoid turning the heat up too high.
Share Your Thoughts…
I want to know more about your experience with making bread at home. Have you tried making your own? Share as much or as little as you want.
Subscribe to VeganWeekly
Join the VeganWeekly community and get inspired each week to cook healthy and delicious vegan food that works for everyone – regardless of your current skill level.
Social Media
Catch up with me on social media…
Facebook ¦ Twitter ¦ Instagram ¦ LinkedIn ¦ Mastodon.green ¦ Post.news
I am really enjoying your weekly emails Jack. Fantastic content.
This guide is exactly what I needed as someone who is constantly intimidated by making flatbread because I compare mine to what my mom makes. That being said, I do enjoy making naan and must try your recipe! Fabulous photos here.